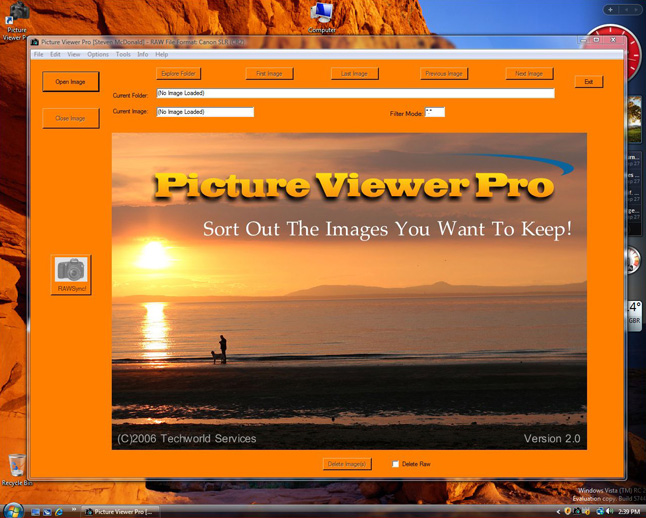
About Picture Viewer Pro
Last Updated: October 22nd 2006At its simplest, Picture Viewer Pro is an efficient and accurate fullscreen and windowed picture viewer!
Much more advanced than the built in Windows application!
It has some special features however, that make it more appealing to power users and photographers who like viewing large photo collections on their computer monitors and want them looking their best!
Picture Viewer Pro - Main Features:
Why switch to using Picture Viewer Pro as your main picture viewer?
- It loads fast from Windows Explorer when you double click on a file. No waiting for a huge app to load!
- Complete unobstructed Fullscreen view of your files by default.
- ESC key always quits - gets it out your way and you are back in Windows again!
- Complete navigation using an extended mouse. Scroll wheel supported. Mouse can quit program too!
- For power users - almost every key on the keyboard has a function. Easy to remember!
- For the photographer - easily view Exif information and exclusive 1-key Info Bar Option
- For the photographer - Use Picture Viewer Pro's RAWSync feature to keep your RAW and JPG files in sync.
- For the net user - use the inbuilt file processing routines to reduce the size of your photos for emailing!
- For the photographer - high quality permanent and on-the-fly greyscale conversion algorithm.
- Inbuilt Outlook support.
- Inbuilt LCD Dead Pixel Test.
- Slideshow mode with various power user options during the show!
- Full transparency support in the UI. Written to work well with Windows Vista (and XP).
- Easy to use file selection and processing features - easily resave your files into different formats.
- Lifetime License - pay once and get all future versions without paying any more.
- Very reasonable license cost. Full support given via this website.
- Trial mode does all the basic features, so you can check it on your
system first. Does not time-out!
File Selection And Processing Features
The idea is you go through your files and select the ones you want to
process.
You then press the file processing key (“’” or “Insert”) and Picture Viewer Pro
processes them in some way.
You can choose to do a straight copy of your selection, a high quality greyscale
conversion, or a format conversion.
Your processed files are stored in a folder called “Picture Viewer Pro” which
you can find inside your “My Pictures” folder (just “Pictures” in Vista – see
your Start Orb for quick access!).
They are actually stored in a new subfolder in there with the original folder
name (along with a new part at the end to describe what was done to the pictures
– e.g. Holiday Snaps 2006 [Converted Jpg].
When doing a greyscale conversion, Bmp format is selected as default as it keeps
the best quality.
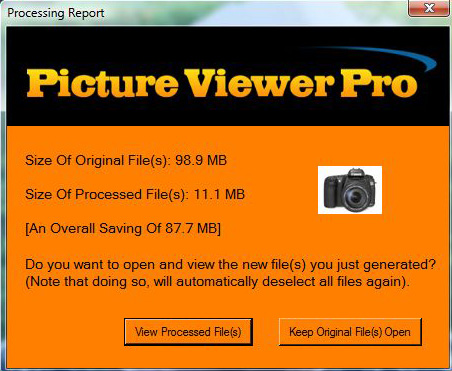
Use the Format Converter to resave your files as Jpg files
(even if they are already in this format to begin with). This will save you lots
of space, as shown in the report above.
This is useful for web uploading or mass emailing of your photos.
Notes:
Folders are created as needed. Any old content is overwritten.
File EXIF shooting data is preserved during copying, greyscale and format
conversion!
The file processing features work on folders containing up to 4000 files.
If you open a folder containing more than that, then Picture Viewer Pro
temporary turns off its selection features.
If for some reason you need to work on folders containing more than 4000 files
at one time, please contact us.
The Fullscreen Info Bars
These can of course be turned on or off by pressing the "I" key.
Details shown on the info bars can change depending on what
information the camera (usually), stored in the image.
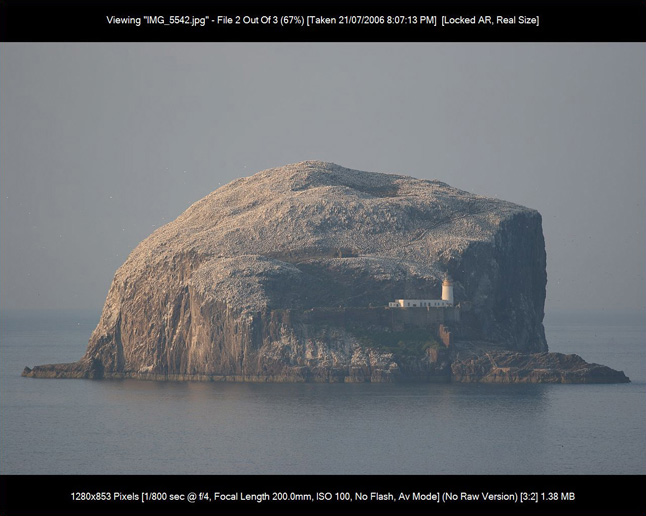
As you can see, a typical top info bar looks like this:
Viewing “IMG_5542.jpg” – File 2 Out Of 3 (67%) [Taken 21/07/2006 8:07:13 PM]
[Locked AR, Real Size]
The top info bar shows the current filename, the index number e.g.. 2 out of 3,
the progress percentage viewed (67%), the date and time the picture was taken
and lastly the current viewing mode.
The viewing mode is to show what mode the program is in as well as what it had
to do to the image to display it on the screen.
For example [Locked AR, Real Size] means the aspect ratio is locked (which is
the normal mode). Real size means the program is showing the image at its real
size and that it fits on the screen fine.
If you are in manual aspect ratio (“M” key), then it shows Manual AR. Other size
reports are “Screen Size”, where the picture is exactly the same size as your
monitor.
The most common size reports are “Shrunk” and “Expanded”. “Shrunk” means the
program had to reduce the picture to fit on the screen (as it was larger than
the screen size in pixels) and “Expanded” means the picture was smaller than
your monitor size and you had Expansion mode switched on (“L” key). The program
then expanded the image to fit the screen as best as it could.
Photographers especially, will appreciate the bottom info bar.
A typical bottom info bar looks like this:
1280x853 Pixels [1/800 sec @ f/4, Focal Length 200.0mm, ISO 100, No Flash, Av
Mode] (No Raw Version) [3:2] 1.38 MB
First off, it shows the size of the image in pixels, next shooting information
is shown.
Shooting information includes the shutter time e.g. 1/800 sec, then the aperture
size e.g.. f/4, then the focal length of the lens used e.g. 200.0mm
It then shows the ISO mode the camera was in e.g. ISO 100, the status of the
flash (if it was fired or not), then the program mode of the camera.
These are the common Canon modes (Tv Mode for shutter priority, Av for aperture
priority etc.)
Next up, is the status of the RAW file for this image (does one exist or not?),
then the aspect ratio of the picture (e.g. 3:2).
Lastly, the file size is shown.
Note: Should any information on the info bars be too large for your screen, you
can alter the size by repeatedly pressing the “5” key.
A Few Notes On RAW Files
This program was originally written as an aid to help with the workflow of
Digital SLR photographers who shoot in RAW Mode.
RAW files can be thought of as digital negatives – they are large and get
processed (developed) into other formats for day to day working. E.g. JPG files
A typical workflow that this program can help with is where people shoot in RAW
format, then run all their RAW files through a processing program such as
“Breeze Browser Pro” and end up with a bunch of Proof files in JPG format.
Another workflow similar to the above, is where people shoot in the RAW+JPG mode
– where the camera saves a RAW and a JPG file at the same time of the scene
photographed. You again end up with RAW and JPG files all mixed together.
Simply make sure all the RAW and JPG files are copied to your computer into the
same folder.
You can then go through the JPG files with Picture Viewer Pro and delete the
non-keepers – afterwards pressing the RAWSync button will sync the RAW files up
by deleting the corresponding RAW versions of the JPG files you deleted.
n short, Picture Viewer Pro can help with file management by keeping your RAW
files and JPG’s for example in sync with each other.
Picture Viewer Pro has since evolved into a much more general use photo viewer
as well.
It's small and pretty fast!
Please note: This program is not for viewing or processing the actual "RAW"
files directly. Other specialist conversion software is used for this.
Picture Viewer Pro can be used to manage them for you and also allows you to
view all other standard picture formats of course!
Each camera manufacturer has their own version of a “RAW” file and this program
supports the following “RAW” filetypes (15 of them):
Canon (CRW), Canon SLR (CR2), Casio (BAY), Digital Negative (DNG), Foveon (X3F),
Fuji (RAF), Kodak (KDC), Konica Minolta (MRW), Leica (RAW), Nikon (NEF), Olympus
(ORF), Panasonic (RAW), Pentax (PEF), Sigma (X3F), Sony (SRF).
This can be selected from the Options Menu – Camera RAW File Format. The default
is Canon SLR (CR2).
Whatever format you choose, the program remembers this setting the next time it
is started up.
After all, its not every day you are going to be changing your particular RAW
format!
Either store RAW files in the currently viewed folder or in a subfolder named
“RAW”.
The "RAWSync" button with the camera icon will sync RAW files up with the
current locked filetype, as indicated by the filter mode in use (e.g. *.JPG).
The filter mode is automatically set when you open the first file in a folder.
The “RAWsync” button will also automatically create a RAW subfolder and move the
remaining RAW files into it, if one does not already exist!
The square "traffic light" indicator at the bottom left can be read as follows:
Red: The RAW files are not in sync!
Amber: The RAW files are in sync, but no RAW subfolder exists yet (press the “RAWSync”
button to fix!)
Green: The RAW files are in sync and a RAW subfolder exists!
As the RAW features are fully working, why not download the free trial version
today and see what you think!
Test Image Pack Available
You can download this pack of
test images to test with Picture Viewer Pro. It contains different aspect ratio
pictures so you can see the differences reported along the info bars. You can
also use it to judge the conversion quality. All these files have been through
the format converter to reduce their filesize from the original and save on disk
space.